Wednesday, November 27, 2013

On the third day of Christmas...

...my true love gave to me, a Christmas-y loft space!!!

Continuing on with my "12 Days of Christmas Series" here. 

You may recall back in March I shared with you guys a picture of our loft space, completely empty. Here's a refresher:


And I never showed this room to you guys again. Mostly because it was ugly. It became the "catch-all" room for my left overs from college. As we've slowly but surely updated our home furnishings, the older/cheaper/uglier things wound up here. When people came over and asked for "the tour" this was the room I'd say "oh, don't go in there, it's not finished yet" and then I'd blush when they'd look anyway and see my orange curtains, blue rug and puppy pads. (SIDE NOTE: This is the room that our lovely dog Ruby decided needed new carpeting). That being said, DISCLAIMER: Most items pictured are re-purposed, unfinished, cheap, in desperate need of an upgrade, and/or strategically placed to disguise carpet stains. 

However, three purchases and one small furniture rearrangement spurred me into turning this under utilized and ugly room into a functioning and welcoming space for the holidays. They are, as follows:

Purchase 1) a white arm chair from Ikea (hoping to get a second matching one for Christmas to complete the set!)
Purchase 2) a FREE (so not really a purchase, but whatevs) side table. 
Purchase 3) a Thomas Kincade painting that my hubby gave me as an early Christmas gift. 

Rearrangement: The blue arm chair that normally belongs in our downstairs living room gets moved up here during the holidays to make room for our Christmas tree. 

So without further ado, and with much fanfare, I proudly present to you, for the first time ever, in the history of this blog (should I keep going? No? Ok, I'll stop)... our loft space!


You can likely figure out why this room wasn't blog worthy before now. Without the blue chair from downstairs, the little side table or the Christmas tree, it was practically empty. However, during the holidays, it is more finished looking, and is now a cozy space to sip cocoa or watch a Christmas movie (I feel a Home Alone marathon coming on). 

On the other side of the room, we have this:
You may recognize this little white table as the same one that used to be in our living room before I completed our secretary.

I have plans to DIY the heck outta that picture frame (disregard the damaged bottom corner). But for now, its a good enough home for my Christmas printable. 


Again, both this smaller tree and those stockings are remnants of my college days. I think they still help to make this space cozy. It's definitely much nicer than it was before!


This is the side table that we got for free last week that kind of catapulted me into making this room a usable space for the holidays. I used some spare ornaments to fill my garage sale bird cage, and I found a cheap frame tucked away that I used for my DIY Christmas printable. The little bow on top of the picture frame helps to distract from the fact that the frame itself is both cheap and ugly. Lastly, I just grabbed a mason jar out of my kitchen cabinet, tied some red ribbon around it, and put in some potpourri to finish off this little vignette. (SIDE NOTE: my friend Hannah helped with a lot of this creativity, so I don't really deserve all the credit). I really wish I had a lamp to put on this table, but I don't. Sad day. 


By far my favorite part of this room is my new artwork wall. I wish I had a before picture, but I didn't think to take one, sorry y'all. It was just the two shutters, looking forlorn and unfinished. That wall is way too big for just the two shutters, so truly, they looked weird. I almost did a full on collage wall using some mirrors and things I have tucked away, but Hannah convinced me to go with a simpler look. I'm so glad she did. I LOVE the way this display turned out, and my shutters frame my new Thomas Kincade painting nicely. It is nice to be able to showcase my new artwork, especially since it was a gift from my sweet hubby.
This grainy picture is a testament to my less than stellar photography skills. You're welcome. 


So there you have it! Our holiday loft space! Hopefully I'll get another white chair for Christmas (if you're reading this Reid, hint hint, wink wink!) and then I can get some new curtains (I'm thinking something neutral, and maybe with a subtle pattern), a new lamp, and do some small DIY projects to upgrade our side table and picture frame. It'll be like a whole new room! I am really happy that this room is finally coming together! 

Thanks for stopping by. Oh, and Merry Christmas!! 
Jesse 

**Update:  This space (and my photography skills) have come a long way since Christmas 2013.

Tuesday, November 26, 2013

My Very 1st Guest Post!

Woo hoo! You read it right peeps! I'm guest posting over at I Ate Skinny today! (I know, that's the most perfect blog name in the history of blog names.) Hop on over if you want to check it out! And a big shout out goes to Becca for letting me stop over and say hi to her readers!

Have a great day!
Jesse

Monday, November 25, 2013

Training Week 10

I cannot believe that training week 10 is over! That means there are less than two weeks left until race day! Two weeks from now I'll be writing a post about the race, telling you guys all how it went. It still seems pretty surreal that I set this goal to run 13.1 miles and now I'm actually on the brink of really doing it!! Seriously, looking back to this day and this day, it is hard to believe the time is almost here. The final week of training cuts WAY back since I'm supposed to rest in preparation for the race, so really all I've got left is one real week of training and then the actual race itself. Geez!! Ok, so here's the weekly recap:

Monday: Trainer appointment. My hubs worked out with me, which was fun.

Tuesday: 5 mile run. It was a good one! My time was 1:01.

Wednesday: 3 mile run. 36:21. I honestly can't remember how I was feeling, all these runs starts to blur together in my mind, but at least I know my time thanks to my handy dandy app.

Thursday: 5 mile run. I really just wanted to eat Mexican food on Thursday so the fact that I did anything at all should be applauded. I didn't run 5 miles, but I did run 3, and I did a really good ab workout.

Friday: Rest day.

Saturday: Keeping with tradition, I blew off my Saturday workout. Can you tell I'm getting sick of having to work out practically every day of my life?

Sunday: 9 mile run. These long distance weekend runs just keep getting longer! In a way they suck (seriously, who wants to run 9 miles ever?!)  but on the other hand, for the first time I feel confident that I actually can run 13.1 miles. My run yesterday was really good. The weather was FREEZING, but I had a good time. I kept a steady pace and finished in 1:52:57. I would have been even faster but I stopped to drink my goo at mile 3 for about 1 minute, and I had to wait for traffic several times. 


If you'd have asked me a few months ago, I would have said that running 9 miles was insanely impressive. Now that I can do it, I realize that it is really not that hard. It takes a lot of will power to work out 5 or 6 days a week, but if you can set your mind to it, you can definitely do it. In hindsight, I can't believe I ever doubted myself. 

Jesse

Friday, November 22, 2013

A Family Recipe

Happy Friday to all my wonderful readers! Thanksgiving is almost upon us, and this post is for those of you who are still finalizing your menu. It's no secret that I'm not a great cook. My specialties are frozen pizzas and lean cuisines. Oh, and of course I'm excellent at whipping up what the French call "les take out dinners".

I digress.


Having said that, I have a family recipe to share with you guys that even I can make. If I can do it, so can you! This one is tried and true (and delicious!). So without further ado...

 Sweet Poh-Tay-Toe Casserole!!

Ingredients:
4 cups canned mashed sweet poh-tay-toes
1 stick of butter (melted)
1 can evaporated milk
1 1/2 cups of sugar
2 eggs
3/4 teaspoon cinnamon
1/2 teaspoon vanilla

Beat poh-tay-toes together with the melted butter. Add the remaining ingredients listed above and mix it all up. Bake in a 9x13 pan at 425 degrees for 20 minutes. Remove from the oven and top with the topping (below).

Topping:
1 1/2 sticks of butter (melted) 
1 cup brown sugar
2 cups corn flakes, crushed (put those suckers in a large zip lock bag and roll over them with a rolling pin. Or if you are feeling hostile, beat the crap out of them on your kitchen counters. Whatever works)
1 cup pecans, chopped

Mix all the topping ingredients together and put it on top of your casserole. Put the casserole BACK in the oven for an additional 15 minutes at 400 degrees. Check that bad boy to make sure its not too liquid-y before you take it out. Just pop it back in for another couple minutes if necessary.


Trust me, it's friggin' yummy y'all. Happy meal planning and holiday prepping! I hope you all have a wonderful weekend.

Jesse

Thursday, November 21, 2013

On the second day of Christmas...

...my true love gave to me, a "family" Christmas tree!!

When you walk in the front door of our home, you immediately find yourself in our living room, which is home to our "main" Christmas tree. 

I really love our Christmas tree, so I'm going to share lots of pretty pictures with you. I'm also going to share with you some tips and tricks for making your own Christmas tree extra special. 

When it comes to Christmas trees, you first have to face one obvious dilemma; real vs. fake?

Each year growing up we would get bundled up in sweaters, hats and gloves to go to Houston Garden Center to pick out a real Christmas tree that was already chopped down for our Christmas convenience. We'd have so much fun comparing the different trees. Some years we'd end up with a big fat tree that looked grand and glorious. One year we somehow managed to pick out a scrawny little Charlie Brown tree. Each year my dad would tell the story of "Christmas 1972, your mother and I didn't tie the tree down tight enough, and we lost it going down the highway".
SIDE NOTE: I'm not actually sure this story was true because my mom would always roll her eyes, but it always made us laugh and is a happy memory. 
Then we'd get home and the entire house would be filled with the fresh scent of pine. I will always cherish these sweet memories, and I always swore I'd never "sell out" and get a fake tree.

But I did, and I'm glad. I'm gonna be real honest here, the main reason we decided to go with the fake tree is the cost. Our living room has two story ceilings and our first Christmas in our house (2011) we purchased a massive 10 foot tree that was AMAZINGly ridiculous. It was so big and SO expensive. I think it was somewhere in the $250-$300 range. Funny how my childhood memories of picking out a tree don't seem to include actually purchasing the tree. Ah, to be young and naive. 

So last year, we decided to bite the bullet and buy a fake tree. It was $250, but that is a one time cost, and this tree should last us at least a decade. It was definitely nice to be able to pull the tree out of the attic again this year without forking over any cash monies. It's also the perfect size for our room. We have tall ceilings, but the room isn't a very big space. So we got a nine foot tree, but it is narrower than your average Christmas tree. Here are a couple other perks to having a fake tree:

1) You can put it up early, instead of waiting for the tree farms and garden centers to start selling!
2) You can manipulate each branch so that there is plenty of room for all your ornaments.
3) Pre-lit! Such a time saver.
4) Less mess. No pine needles all over the floor.
5) Less likely to catch fire. Tree fire?! Ain't nobody got time for that. 

Whichever you decide, real or fake, you can have a beautiful tree! If you have a fake tree, here are a few pointers to make sure your tree is as beautiful as possible. 

1) Pick a tree that has some diversity in it. 

Our tree has some fluffy looking branches... 

 ...some pine cones...

 ...And some berries.

The variation adds depth and makes the tree look more realistic. I'm all about a good bargain, but don't be super cheap (I know I'm a hypocrite seeing as I'm the cheapest person ever) and get one of those rinky-dink trees with three branches and only one type of foliage. Make the investment in a good tree and it will be more beautiful and last longer.


2) Fluff it, fluff it real good. 


Here is what ours looked like "pre-fluffed". You may not notice the issues, so I've pointed out some of the worst spots for you.  See below:

You can see straight through the tree in some spots and there are strange gaps. I know, it is tempting to whip out those boxes of shiny ornaments and get to decorating, but trust me, taking the 30 minutes or so to complete this step will make a big difference. 

See! This before-after photo shows how much prettier it is! Much fluffier :)


3) Make it smell real. 

These scented ornaments smell super amazing, and if you hide them deep inside the branches of your tree, you can't even see them! They sell these at most major retailers (Target, Walmart, Walgreens, CVS, Home Depot, etc).

It's also a good idea to buy a few "tree scented" candles and have those lit throughout your house too. 

Now, you've either got yourself a real tree, or a convincing fake one. Next decision, to theme or not to theme? 

Themed Christmas trees, with color coordinated ornaments, ribbons, and an "over the top topper" are unarguably, gorgeous! 

I could literally drool over this tree all day. Gross? #sorrynotsorry

My heart goes pitter patter over these beautiful creations and a part of me desperately wants our living room tree to look just like that. However, each Christmas my sentimental heart overpowers my design mind and I end up making our living room tree a family/memory tree. I have so many ornaments that are near and dear to my heart and I have to showcase them, even if they aren't color coordinated or made of burlap. Hey, if Christmas isn't supposed to be about family memories, I don't know what is. Here are a few of my favorite family ornaments:

The ornament in the top left is filled with the dried flowers from my wedding bouquet. The "First Year in the New Home" ornament was gifted to us by our realtor Sherri on the day we closed on our house (which was also the day we got engaged). The "baby's first Christmas" ornament is from the year I was born, and my mom has saved it all these years for me to have on my own tree one day. 

 My hubs and I have started a collection of ornaments from all our travels. Just this year alone we've gone to the Cayman Islands, New Orleans, Charleston and Disney World! 

Every year I love putting up and then staring at our family tree for hours on end. 


I hope these pointers are helpful, and I hope you've enjoyed our family Christmas tree!

MERRY CHRISTMAS!
Jesse


Tuesday, November 19, 2013

On the first day of Christmas...

...my true love gave to me, two FREEEEEEEEEEE PRINTABLES!! You know you want to sing it with me!! 

Welcome to my first installment of the "12 Days of Christmas" series! I hope you enjoy what I have in store for you today. Some free printables!

This fun printable comes in two sizes, so select the links below to download them!

Click here for the 4x6 version! 


And for those of you who prefer something that doesn't draw so much attention to your love of alcohol (or is it only me who feels that way?) I've got something a little more traditional for you. 


Click here for the 4X6 version!

Click here for the 5X7 version! 

Merry Christmas!!
Jesse

Monday, November 18, 2013

Training Week 9

Hi everybody. I just finished training week 9, and not going to lie, it was total crap. I feel really discouraged and not at all ready for the race. Here's the breakdown:

Monday: My knees were still really sore from the 8 miler I had run the day before, but since I just had a trainer appointment (rather than a run) I stuck it out and got a good workout in.

Tuesday: 5 mile run. I decided to do a treadmill run because it was pretty late, and although I did have to walk a little bit during the last two miles, I still finished in 59 minutes, so I was really glad to come in under the one hour mark. However, after I finished running I realized my knees were KILLING me. It's weird how sometimes you have to stop moving before you realize how badly it hurts to move.

Wednesday: 3 mile run. I was in so much pain all day and I was wobbling along like a decrepit hobbit. I debated all day about what to do. I REALLY didn't want to skip my run because I had worked so hard for so many weeks and hadn't yet missed a single run, and I didn't want to fall off the wagon so close to race day. In the end, I decided I needed to give my knees a rest, so I skipped my run that night. Sometimes working up the will power to go for a run is really hard, but it was even harder to choose NOT to run. I was sad and feeling a little defeated.

Thursday: 5 mile run. I was still in pain, so I decided to skip this one too. Womp womp.

Friday: Rest day.

Saturday: I was supposed to work out, and I didn't. Why? Because I'm lazy. On the bright side, my knees finally felt back to normal (pretty much) but on the other hand, I was feeling pretty depressed. When your body becomes accustomed to working out 5-6 days a week and suddenly you go 4 days without any physical activity, I think it shocks your system (and not in a good way). I think my endorphins level bottomed out at negative 10,000 and I'm also pretty sure I gained about 20 pounds in those four days (SIDE NOTE: I ate TERRIBLY) so all in all I was feeling pretty crappy.

Sunday: 10K (or 6.2 mile) run. I was so ready to get back out there and pound the pavement and I was really looking forward to this run (and feeling grateful that it wasn't 8 miles like last Sunday). The first 2 miles felt really good and it was so great to be outside and moving my body again. However, soon after that the pain started creeping in and my knees were hurting. I walked A LOT. The combination of injured knees and a sedentary lifestyle for the past 4 days combined to make this run really difficult. I wanted to cry. My time was 1:23:10 which was SO SLOW. I wanted to finished at least a full 10 minutes faster than that. 

At this point, I really don't know what I'm going to do. I think my body is telling me it is ready for a break, but I've worked so hard for months, and I can't give up now. I'm DETERMINED to run this race. Any advice, encouragement or support you may have, please send my way. I'm going to cross that finish line in three weeks, even if I'm crawling.


 Yup, I got this email this weekend. 

This was my view as I laid in bed last night. Gotta ice them knees.

Thanks,
Jesse

Tuesday, November 12, 2013

The 12 Days of Christmas

Merry "almost" Christmas! Can you believe we are already half way through November? I can't! I absolutely love the holiday season. Whether it's the sound of a crackling fireplace, the smell of freshly baked cookies, or the laughter of little children as they try to sleep but can't because they are too excited for Santa's arrival. It all fills my heart with joy and brings a smile to my face. Therefore, in honor of my first Christmas as a blogger, I am pleased to announce that I will be having a "12 Days of Christmas" series! 

That's right! Between now and Christmas I will do 12 Christmas themed posts for your holiday home making enjoyment! I hope you will find what I have planned inspirational, beautiful and helpful! I will provide a variety of holiday tips and tricks, a few ideas for your own home and a full tour of my holiday home on Hidden Oaks!

 So be on the lookout for "The first day of Christmas" soon. Until then...


Thanks, and Happy Holidays!
Jesse 

Monday, November 11, 2013

Training Week 8

I've just completed training week 8 of my 12 week training program for my first half marathon, and it was an interesting week. It certainly brought with it some new challenges that I haven't faced before. Here is the breakdown:

Monday: Trainer appointment, same as always.

Tuesday: 4.5 mile run. I had two new challenges to face with this run. Challenge #1: I was sick! Luckily not death bed/105 degree fever sick,  but certainly cold/achy/stuffy sick. I had to walk quite a bit, but hey, I was sick! Only bad asses and crazies run while they are sick, and since I like to think positively, I'm not classifying myself as a crazy! ;)  Challenge #2: The time change means it is dark super early now, but I don't really have any choice but to suck it up buttercup and run in the dark. Oh well, I'm adjusting! My time was slow, 58:45, but at least I did it.

Wednesday: 3 mile run. Still sick, still dark. I walked A LOT. I ran the first mile but was struggling and was forced to walk quite a bit the last two miles. Again, my time was slow, 38:14, but I was determined not to skip any training runs despite my less than optimum physical condition. 

Thursday: 4.5 mile run. I was feeling better and was able to knock out a good run without walking. My time was 53:13, which was so much better than Tuesday's time.  It was still really dark, but it was cool and breezy and an enjoyable run. 

Friday: Rest day.

Saturday: I went on an extremely leisurely stroll with my hubby and my dog, but otherwise didn't do anything. For some reason I have really struggled with these Saturday workouts the past few weeks. I'm not sure why, but I can't seem to summon the will power to actually work out. Bah!

Sunday: 8 mile run. This run was a solid run for me. The distance was intimidating because it was the longest for me to date. I was feeling a little nervous about it, but mostly curious to see how it would go. I tried the goo for the first time (basically a little pouch that you drink during your run to boost your energy) and while not a delicious snack, it was fine. I'm not sure if it really helped me or not, but I didn't feel hungry or ridiculously exhausted at any point, so I think that is a good sign that it didn't hurt! I ran the entire way which made me really happy. I did pause for about one minute as I was nearing the end of mile 2 to drink my goo and take a swig of water, so that slowed my time a bit, but that's okay with me. My knees are KILLING me today, particularly my left knee. I really hope that it is just normal soreness and not the first signs of an injury. I'm taking glucosamine daily and am going to ice both knees tonight. 


I'm looking forward to week 9. Let's just hope these sore knees get better quick so I can knock out the 5 mile run I've got scheduled for tomorrow!

Thanks for stopping by!
Jesse

Wednesday, November 6, 2013

Framing the Bathroom Mirror

I'm really excited because I can cross off another item on my "List of 8 Things To Do In The Next 12 Months". My goal was to get two or three of these items done by Thanksgiving, and I am happy to report I've officially completed two! Yay for setting and keeping goals! You can read about the first item I completed on the list here

I am really happy with the way our bathroom mirror frame has turned out so I thought you might enjoy a tutorial on how it was done. 

First things first, here are the supplies you will need:

1. Trim/wood. We went with a trim that had the look of wood but is much easier to work with because it is virtually weightless. I have no idea what it is made out of but it is almost soft on the back side, like Styrofoam, but hard on the front, like wood. It was very inexpensive, I think about $12 for the three pieces we needed to make the frame.  We found it in the trim section at Lowe's. Make a point to pick trim that looks straight and level. It is normal for wood and trim to be somewhat warped, but the less warped the better in this case.

2. Caulk gun. Like this: 

  
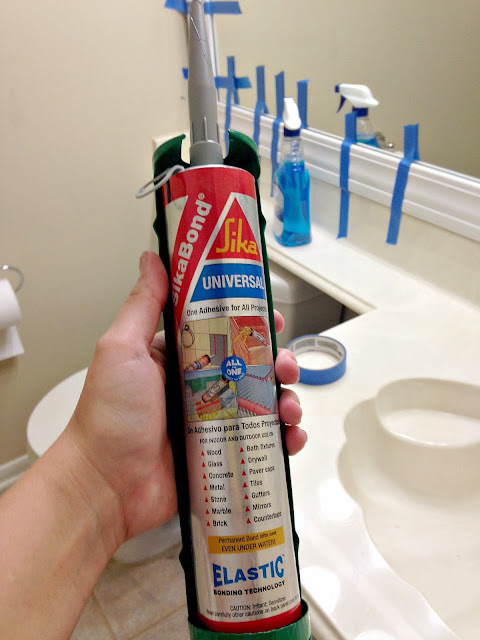
3. Mirror glue. Like this:


3. Miter saw or box. My father-in-law was kind enough to cut our edges for us using his miter saw. 

4. Paint, painters tape and paint brush.

5. Caulk.  

Ok, now you've got your supplies, onto the actual construction of the frame!


Step 1. Measure your mirror (twice!) before cutting your frame to the correct size. We intentionally made our frame about a half inch too long and a half inch too tall so that it would hang over the outside edges of the mirror just a tiny bit and keep the edges looking clean and finished. I recommend that you do the same thing if you tackle this project.  If you want your corners to meet at a 45 degree angle, this is where your miter saw or box will come into play. 

Step 2. Paint the trim. You should now have four individual pieces of trim. Assuming your mirror is a rectangle, you should have two long pieces and two short pieces. Now is the time to paint your trim whatever color you like. Be sure to paint the back side of the trim as well because you will be able to see the back of the trim in the tiny reflection the frame will cast on the mirror. That is a small detail, but it will make your project look more professional when it is all said and done! I wanted our frame to be white and because I am cheap thrifty,  I chose to use leftover paint from our kitchen cabinet makeover (read about that here). 

Step 3: Once your paint has completely dried, it is time to hang your frame. Whip out your handy dandy caulk gun and mirror glue and go to work. The glue we purchased takes two hours to dry, so be sure to add painters tape to the frame to hold it securely in place until the glue dries. Also, be warned, this mirror glue stuff is really sticky, so try and work as neatly as possible or you'll find yourself with a mess on your hands (not that we know this from experience or anything, lol!). When you add your glue to the back of your trim, be sure not to get the glue too close to the edges. For one, if its too close to the edges it may seep out when you press it flat against the mirror. For two, if you get the glue too close to the edge, you'll be able to see it in the tiny reflection on the mirror. Again, this is another small detail that will help your project look polished when it is all said and done!

Here is one small section of our mirror where we accidentally got the glue too close to the edge of the trim. If you look closely, you'll see the glue reflected off the back of the trim. Oops!

At this stage, your mirror should look something like this: 


Step 4: Caulking the corners. Wait until the glue has completely dried before moving onto this step. We waited a full 24 hours, just to be safe. Unless you are a seasoned pro with a miter box, it is likely you'll notice your 45 degree angle corners do not meet up 100% perfectly. (SIDE NOTE: my father-in-law happens to be a seasoned pro, so our corners were nearly perfect). Here is what ours looked like: 


Pretty close to perfect, but you could still see the crack. Again, whip out your caulk gun and caulk (NOT glue) to fill in those tiny cracks. This will make the corners of your frame look finished and completely perfect.


Step 5: Touch up the paint. Your frame may get a little dinged or dirty while you are working on it (remember how I mentioned earlier that the mirror glue tends to make a mess?) so make sure you have enough paint left over to do a final touch up coat. 

And... voila! You've got yourself a custom framed bathroom mirror! 


I'm very happy with the results of this project. Each small change takes our home further away from 1980's builder grade and one small step closer to custom! Good luck with your mirror framing endeavors!

Thanks!
Jesse