

Friday, January 30, 2015
My 17 Favorite Accessories
Not for the first time, I find myself at a loss when trying to name my home decor style. Is it farmhouse, shabby chic, rustic, or country cottage? And what the heck is with my new tendency to be drawn towards minimalistic design? I think the truth is, my style is a combination of all those things with the added fact that I try to do it all for as little money as possible. Whatever you want to call it, I've rounded up a list of my top 17 favorite accessories for achieving a rustic/cottage/farmhouse/shabby chic look! Enjoy!
Monday, January 26, 2015
16 Affordable Flooring Options
When it comes to affordable ways to update your home, most people don't automatically think of flooring. But there is good news! Now it is possible to make your floors beautiful without spending thousands of dollars.
My little old blog started picking up steam after I shared with the world the transformation of my laundry room floors.

And, not long after that, I used inexpensive materials to transform our guest bathroom floors.

These posts generated so much interest that I thought it would be a good idea to share with you guys some other awesome flooring transformations that were completed on a budget. The best place for me to do my research? Hometalk! For those of you who don't know, Hometalk is sorta like Pinterest, but only for home decor. So there is no fitness, recipes, fashion, humor, but there is tons of AMAZING home ideas. From paint to flooring, gardening to organization, if you need home inspiration, Hometalk is a great place to go searching for it! Just click on the photo below and enjoy reading about some truly ingenious people who have transformed their floors on a budget.

My little old blog started picking up steam after I shared with the world the transformation of my laundry room floors.
And, not long after that, I used inexpensive materials to transform our guest bathroom floors.
These posts generated so much interest that I thought it would be a good idea to share with you guys some other awesome flooring transformations that were completed on a budget. The best place for me to do my research? Hometalk! For those of you who don't know, Hometalk is sorta like Pinterest, but only for home decor. So there is no fitness, recipes, fashion, humor, but there is tons of AMAZING home ideas. From paint to flooring, gardening to organization, if you need home inspiration, Hometalk is a great place to go searching for it! Just click on the photo below and enjoy reading about some truly ingenious people who have transformed their floors on a budget.
Enjoy, and good luck with your flooring DIY!
- Jesse
- Jesse
Friday, January 23, 2015
Painting the back door black
The notion of painting a door black is not a revolutionary one. The idea has been all over Pinterest and blogs for a while now. I think it is a great idea and for many homes it can really make them feel classy and expensive.
When I noticed our back door was really starting to look worn, I thought that painting it black would be a great solution.


After I was done painting, I let the door stand open for about 2 hours before closing it. It takes up to 30 days to fully cure, and since there was no way I could leave the door open that long, I just waited until I was sure it was dry. The paint hasn't stuck at all, and I've opened and closed it countless times since then.


When I noticed our back door was really starting to look worn, I thought that painting it black would be a great solution.
Scratch marks from our dog.
General dirt and grime build up.
I stopped by Lowe's to pick up the following:
As far as the actually painting went, I didn't need to do anything special. However, the prep work and the clean up work was pretty extensive for this project.
I started by cleaning the door very thoroughly using an all purpose cleaner. Once I was satisfied that it was clean, I taped off the glass. It took a while because there is so much glass on my door, and I wanted my lines to be as clean as possible.
Then I started painting! I opened the door while I was painting and while it dried so that the edges wouldn't stick. (SIDE NOTE: Since this was an exterior project, I waited until we had some nice weather. It's been really cold here lately, and I didn't think the paint would cure properly if I applied it in 40 degree weather. The day I painted the door it was in the 60's and sunny.)
It took three coats to get a nice, even finish. After the paint had dried, I used a razor blade to score the edges of the tape and make peeling it away easier. Then I had to go back over the glass with q tips to get the edges as straight and clean as possible. I had to do a few touch ups around the door knobs and edges of the glass where the paint peeled off with the tape. So far it has held up very well, but in hindsight, it probably would not have hurt to sand the door first.
Here's the finished product:
After I was done painting, I let the door stand open for about 2 hours before closing it. It takes up to 30 days to fully cure, and since there was no way I could leave the door open that long, I just waited until I was sure it was dry. The paint hasn't stuck at all, and I've opened and closed it countless times since then.
All in all, I think it was a success! It definitely looks cleaner, fresher and shinier :) I probably could have gotten away with a sample size of paint because my little quart is still nearly full. Anybody have anything they need painted high gloss black? If so, I got the hook up!
Thanks,
Jesse
Tuesday, January 20, 2015
Custom Artwork
Lately I have found myself gravitating towards more modern and sophisticated design and wondering what the best way to incorporate these elements into my current home is. I want to keep the majority of my home the same as it currently is because not only do I still like it, but I don't have the money to do a complete overhaul. While perusing Pinterest a few weeks back, I ran across this beauty from Ballard Designs.
 I instantly fell in love with this art for its sophistication, and thought it would still go well with my existing decor. The only downside, it cost $449. Just a tad above my budget. So I decided to try to recreate it.
The supplies I used:
A 4 x 4 blank canvas (I received mine as a Christmas gift, but it was purchased at Michael's using a 60% off coupon, and only cost my mom $30).
Various foam and small bristle brushes ($7 at Lowe's)
Two small foam rollers (already owned from previous projects)
Acylic Paint ($12 at Michael's)
paper plates (used as pallets)
tape measurer
pencil
Total cost: $49 (Although for me, it only cost $19 since the canvas was a gift)
Here are the colors I used:


The Process:
Step 1: Lay out canvas on a work surface in a well lit area.
 Step 2: Prime. I've been instructed that its best to prime with either a pale blue or a pale pink so that the end result isn't too bright. Since I didn't have enough of either color to prime the entire canvas, I used a combo of both colors as my primer. I didn't prime the edges of the canvas, but should have because it took several coats of paint to get the edges painted.

Step 3: Find the center of your canvas. This really comes in useful when doing Step 4, next.

Step 4: Create a base coat with your basic colors to define the shape of your painting. You'll be able to go back in and add dimension and texture later on. (SIDE NOTE: To be honest, from here on out it all became guess work and trial and error, so by all means, please deviate from my instructions as much as you want if you decide to do a similar project!)


The supplies I used:
A 4 x 4 blank canvas (I received mine as a Christmas gift, but it was purchased at Michael's using a 60% off coupon, and only cost my mom $30).
Various foam and small bristle brushes ($7 at Lowe's)
Two small foam rollers (already owned from previous projects)
Acylic Paint ($12 at Michael's)
paper plates (used as pallets)
tape measurer
pencil
Total cost: $49 (Although for me, it only cost $19 since the canvas was a gift)
Here are the colors I used:
The Process:
Step 1: Lay out canvas on a work surface in a well lit area.
Probably not necessary to list this step, but it never hurts to be thorough.
Anybody else think this is the perfect opportunity for a Big Lebowski reference? No? Just me?
Moving on.
Step 3: Find the center of your canvas. This really comes in useful when doing Step 4, next.
Like so.
Step 4: Create a base coat with your basic colors to define the shape of your painting. You'll be able to go back in and add dimension and texture later on. (SIDE NOTE: To be honest, from here on out it all became guess work and trial and error, so by all means, please deviate from my instructions as much as you want if you decide to do a similar project!)
Also, sorry the pictures aren't great.
We all know I'm a terrible photographer, and it was really hard to fit in one shot.
Step 5: Begin playing with textures and dimension. It became painfully obvious to me at this point that my painting would never look exactly like my inspiration that I found on Pinterest, so I decided to embrace that. I'd used my inspiration as the basic form of my painting, but my shapes and colors were going to be different, and that is okay. I was still determined that I'd end up with something sophisticated, which was the entire point of this project anyway. Here's what mine looked like at this stage:
Doesn't it kinda look like the ocean meeting land from space? Funny since the inspiration artwork kinda mimics the idea of clouds (to me, anyway). Not exactly what I intended, but not a problem either.
Step 6: Add your finishing touches. For me, this meant blending the dark edges so they faded more gradually into the other colors, adding additional texture to the lighter blues, adding pops of metallic gold using small brushes, and using a foam roller to lightly coat the entire painting with a very light gold. Last but not least, I painted the outside edges of the canvas a dark blue to make the entire artwork look more polished.
Here is the final product:
I'm happy with the way it turned out, especially since this was my first time trying a project like this. Originally, I was considering placing it above the mantel in my living room, but when I saw it in this space, I just knew this was its home. It is over sized for this room, but it just looks so elegant! Nothing like massive artwork to trick people into thinking you've got money! ;) It really takes our formal dining room up a notch.
As I said earlier, by no means is mine an exact duplicate of the artwork I originally was inspired by, but I'm really okay with that. So if you want to save $400 and have a one of a kind art piece, try making your own. If you hate it, you can just paint over it and start again! Good luck in your artistic adventures, and as always, thanks for stopping by.
Love,
Jesse
Friday, January 16, 2015
Picking the Perfect Grey Paint

NOTE: This post is not endorsed by any company or brand, this is simply my opinion of a great product!
I will be the first to admit, that picking out paint, particularly when it comes to neutral colors, is really hard. More than once I've gone to the store for samples or swatches only to end up having to return multiple times because I was unhappy with my selection. Those whites, greys, tans, taupes and greiges all looks so similar when you see them in photos on Pinterest, but in reality the colors are completely different depending on the house, the room, the lighting, the time of day, and about a million other factors.
So, when I fell in love with Tinman by Kwal while on a Southern Living home tour with my mom and sister, I was afraid that the beauty of the color wouldn't translate in my home. The room in the house tour that was painted that color was bright and airy, with lots of white furniture, whereas the room I was eye balling it for in my home had really awful natural lighting, and was full of dark, bulky furniture. Nevertheless, I was determined to try it out.


The two pictures above are of the room in the showcase home with Tinman walls. Swoon!!!

Okay, back to the man cave. I've never shared this room on the blog before because it is the one room in the house that Reid has complete creative control over, and I'm not allowed to "girl it up". It's decorated with surfing posters and his snowboard hangs above a massive television. Not very blog worthy, but it makes him happy so its a good room :) When I found the tinman paint color, I knew if would look great in that room and after weeks of me asking him, he finally gave me the go ahead to paint it! He trusted me that a fresh grey color would still look manly.


On an unrelated note, I am dying to replace that window with a big huge window. This room honestly gets the worst natural light. It's a big room and that is the only (tiny) window. Does anybody have any experience with a project like this? I wonder how much it would cost. Hmm...
So anyway.... If you've been toying with the idea of painting a room in your home a lovely neutral gray but haven't taken the plunge because it is difficult to pick a color, then your search is over! Tinman by Kwal in a satin finish was the right choice for me, and I think it could be the right choice for you too!
Thanks for stopping by,
Jesse
Thursday, January 8, 2015
Peel & Stick tile strikes again!
In November I shared with you how I transformed the dated linoleum floor in our laundry room using inexpensive peel and stick tile. It turned out to be one of my favorite projects to date not only because it made the room look so much better for such little money, but also because my hubs and I had a lot of fun doing it together. So, I decided I should do it again in a different room :)

About a year and a half ago, I shared with you our guest bathroom mini makeover, and to answer your question, no, I still haven't forgotten what a pain in the ass that "mini" makeover was. Although the mini makeover definitely helped bring that room into the 21st century, it was still a long way from perfect. (As a matter of fact, it is still a long way from perfect, but baby steps). The main thing about that room I still hated was the toilet. I'm pretty sure it was as old as the house (26 to be exact) and it was showing its age. The bowl was stained and gross and though I tried all the Pinterest hacks out there for cleaning a stubborn toilet, none of them did the job. I got the Kohler Devonshire toilet for Christmas, and I'm in love with it. I'm in love with my new toilet. Don't judge me.

But, it didn't really make sense to me to install a new toilet and not do something about the hideous floors while I was at it.
 See what I mean? Pretty hideous. So I picked out some wood-like peel and stick tile.
 This is the name of the stuff we put in, and it is from Lowe's. It's slightly more expensive than the fake tile that we put in the laundry room at about $2 per plank (versus 88 cents per tile in the laundry room), but still significantly less expensive that real wood or tile. We had a box of 30 planks and only used 26 of them. So that's about $50.
And in my personal opinion, the results are truly beautiful. See for yourself:


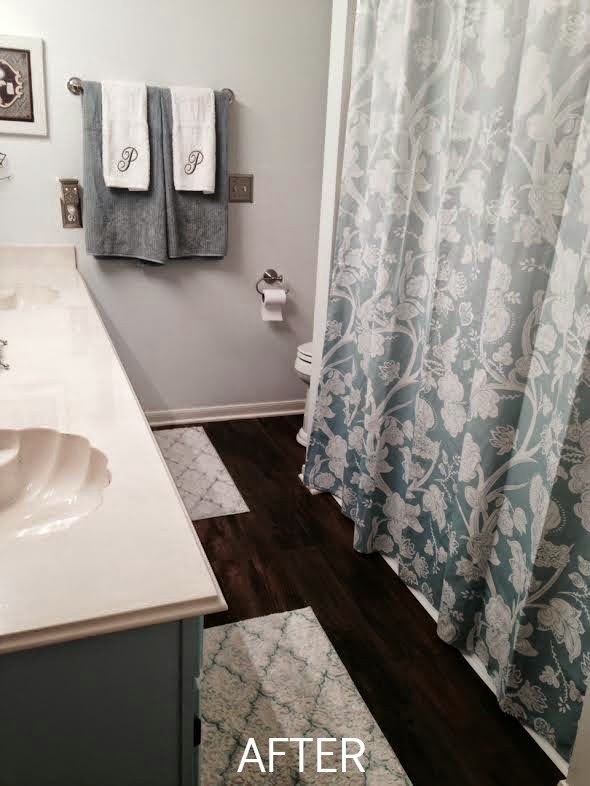
Since this bathroom is upstairs and used primarily for guests, the shower doesn't get used very often. I'm not sure how well peel and stick would hold up in a bathroom that gets daily use, but in my opinion, even if it only lasts a year, you've gotten your money's worth because its just so cheap! It's really a smart choice to hold you over until you can afford a bigger make over.
We started the project around 1pm by removing the old toilet, and had the new floors and new toilet and the entire room put back together by 10pm that same day. Honestly, the toilet took more time to install than the floors because we were newbies at that. Not to mention, it was fun! Not a bad way to spend a Saturday afternoon/night :)
For more information on how to install peel and stick tile, see my previous post, here.
So now all that is left to make this room complete is new counters/sinks, new lighting, new faucets, framing the mirror, and repairing the door frame that my dog chewed up. Yup, I still haven't done that. Again, please don't judge me.
What do you guys think? Have you fallen for peel and stick as hard as I have?
About a year and a half ago, I shared with you our guest bathroom mini makeover, and to answer your question, no, I still haven't forgotten what a pain in the ass that "mini" makeover was. Although the mini makeover definitely helped bring that room into the 21st century, it was still a long way from perfect. (As a matter of fact, it is still a long way from perfect, but baby steps). The main thing about that room I still hated was the toilet. I'm pretty sure it was as old as the house (26 to be exact) and it was showing its age. The bowl was stained and gross and though I tried all the Pinterest hacks out there for cleaning a stubborn toilet, none of them did the job. I got the Kohler Devonshire toilet for Christmas, and I'm in love with it. I'm in love with my new toilet. Don't judge me.
Ain't she purdy?
But, it didn't really make sense to me to install a new toilet and not do something about the hideous floors while I was at it.
And in my personal opinion, the results are truly beautiful. See for yourself:
Since this bathroom is upstairs and used primarily for guests, the shower doesn't get used very often. I'm not sure how well peel and stick would hold up in a bathroom that gets daily use, but in my opinion, even if it only lasts a year, you've gotten your money's worth because its just so cheap! It's really a smart choice to hold you over until you can afford a bigger make over.
We started the project around 1pm by removing the old toilet, and had the new floors and new toilet and the entire room put back together by 10pm that same day. Honestly, the toilet took more time to install than the floors because we were newbies at that. Not to mention, it was fun! Not a bad way to spend a Saturday afternoon/night :)
For more information on how to install peel and stick tile, see my previous post, here.
So now all that is left to make this room complete is new counters/sinks, new lighting, new faucets, framing the mirror, and repairing the door frame that my dog chewed up. Yup, I still haven't done that. Again, please don't judge me.
What do you guys think? Have you fallen for peel and stick as hard as I have?
As always, thank you! I hope you enjoyed your visit!
-Jesse
Subscribe to:
Comments (Atom)