Tuesday, December 24, 2013

On the 12th day of Christmas...

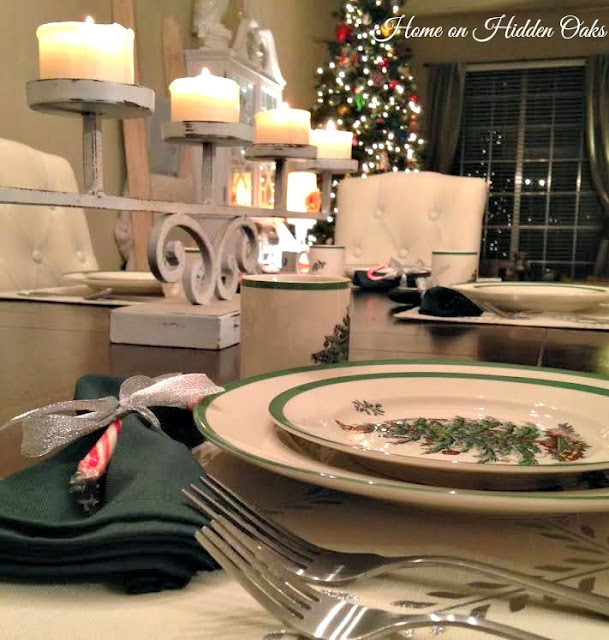
.. my true love gave to me, a dining room with a Christmas table scape! 

Merry Christmas eve!! I hope you have all enjoyed my "12 Days of Christmas" series. To wrap it all up, I thought you might like to see our Christmas dining room.

Our dining room is tiny cozy. I constantly see beautiful buffets and hutches that I so desperately want to buy, but unfortunately, I just don't have anymore room for furniture. Whomp whomp.

I decided a simple and clean table scape would be the best option for this space. I wanted it to be fresh and festive, but not too busy. Since it's not a huge room, I was afraid that too much stuff would just make it feel smaller. Here's what I came up with, I hope you enjoy:


I hope you have enjoyed my "12 Days of Christmas" blog series and I wish you and your family a very Merry Christmas and a happy new year! 

Jesse

Monday, December 23, 2013

On the 11th day of Christmas...

...my true love gave to me, Christmas in the kitchen!

Christmas is only two days away! Yay!

I shared with you guys how Christmas has taken over my mantle, loft space, living room, master bedroom, porch and friend's house. So why not also share with you our Christmas kitchen? Take a look around and enjoy!

The breakfast table is festooned with festive Santa hats.


 I really love my Spode Christmas dishes.


Moving along to our bar area, a creative winter vignette has made itself at home inside one of my cake stands... 


...And some of my Christmas Spode dishes are on display.


I love incorporating food related items (like my dishes and cake stand) into my Christmas kitchen decor. 
Moving to another corner of our kitchen, you'll find wintery pine cones and tree branches nestled in a glass jar...

 Along with a "joyful" lamp...

Our Scentsy makes our kitchen smell like freshly baked cookies all season long. 


 And this little corner is home to an owl cookie jar and a WONDERFUL smelling candle.


Christmas cards from our loved ones are taking over the fridge...

and Mrs. Claus has set up shop in here as well.

As always, thank you for stopping by. I hope you find yourself surrounded by family and friends this week. And don't forget to have yourself a merry little Christmas :)

Love,
Jesse 

Thursday, December 19, 2013

On the 10th Day of Christmas...

...my true love gave to me, a Christmas porch!

I may be going at this a little backwards. I probably should have shown you our Christmas porch on the first day, since it's the first thing you see when you arrive at our house. Oh well. Anyway, welcome to our Christmas porch!

I decided to keep things simple and welcoming on our porch this holiday season. 


I'm about to go off track a little bit, but I want to give you guys the back story about this tree because it just makes me so happy. Not only do I love the way this tree looks on our porch, but it has sentimental value too. This tree was a house warming gift to us from my mom on the day we bought our house/got engaged. Reid and I had JUST walked in the door and gotten engaged maybe 15 minutes earlier, and we were sitting on the stairs (no furniture to sit on yet), holding hands and dreaming about our new life together, when we saw my mom scurrying around on the front porch like a little Christmas elf, setting this tree up for us, with a huge grin on her face. She didn't knock on the door or let us know she was coming because she didn't want to interrupt (she knew Reid was going to propose at any minute, but didn't know it was already a done deal!) She then headed back to her car to leave so we walked outside to ask her what the heck she was doing. She seemed genuinely surprised to have been caught (although we didn't have any curtains up on any of the windows, seeing as we had just moved in, so it wasn't exactly hard to see her out there). I showed her my ring (which of course she had seen several weeks previously when Reid first bought it), we hugged and laughed and then she came inside to see the house. After that my phone started to blow up as word spread to our friends and family that Reid had asked me, I'd said yes, and the big secret was no longer a secret. The rest of the day was a blur of pure joy as friends and family stopped by to see the house and share in our joy at our engagement.

SIDE NOTE: That evening my brother and Reid decided they should light the fire since it was chilly out and we were having our first unofficial house party.  Because they are sooo smart, they didn't open the floo before lighting the fire, and we nearly burned the entire place down right then and there.  That would have been quite a sad ending to an otherwise lovely day.

So, in a nut shell, this tree brings back memories of what is probably one of the happiest days of my life :) Moving along...
 I found this adorable little guy at a garage sale for $1. Score!


And this wreath was a Home Goods find from last year. Thank you for taking the time to tour our Christmas porch! 

Merry Christmas!
Jesse 

Tuesday, December 17, 2013

On the 9th Day of Christmas...

...my true love gave to me, money/time saving gift wrapping tips!!

Can you believe that Christmas is next week? I absolutely cannot. By now, most people have decked their halls and trimmed their trees, and now the mad dash is on to find all those last minute gifts. I decided to be good this year and start shopping early. I bought the big presents on my list at the beginning of November, thinking that I'd spend my money earlier and just get it over with so I wouldn't be so strapped for cash come December 25th. Too bad this logic failed miserably. Shopping during the holidays is fun, so instead of getting all my shopping done early and then saving my money, I got all my shopping done early and then added more items to my list and bought those too! Gift giving is too much fun. Ah, well... YOLO.

So what to do with all these beautiful gifts? Wrap them of course! I love to wrap presents, so I'm going to share a few tips and tricks to help make gift wrapping fun, beautiful and affordable!

Tip #1: Make it Fun!
Many people think of wrapping as a chore, but turn on some Christmas tunes (my favorite holiday station on Pandora is "A Christmas to Remember") and open a bottle of wine or make some hot apple cider and you've got yourself a fun little DIY project rather than a daunting task.

Tip #2: Boxes
Wrapping can be frustrating when you are trying to figure out how to wrap strange shapes, so make sure you put your gifts in boxes. I save all my boxes throughout the year so I don't have to fork over any extra money for them, but you can always buy some at the dollar store if you need more. Not only will wrapping be easier when you have symmetrical shapes to work with, but the outcome will be much more beautiful under your tree.

Tip #3: Paper with a Grid
You'll find it easier to measure if you pick a paper with a grid on the back side, and you'll end up wasting less paper too!


Tip #4: Pick a Theme
Pick a theme for your wrapping paper and stick with it! You can use newspaper or kraft paper for a more unique look...


or you can go with something traditional, like snowmen. Either way, make sure you have a cohesive theme throughout. If you've got 5 different kinds of wrapping paper, the patterns and colors will likely compete with each other and you will not end up with a cohesive look. This year I've chosen to go with a traditional plaid paper in shiny reds and greens.


Tip #5: Bows
No present is complete without a bow. If you have the time and talent to hand make beautiful bows for every single one of your presents, then more power to ya! I, however, do not. I like to buy the pre-made bows and stick one on top of each of our presents. This is inexpensive, easy and still very pretty. Again, I chose shiny bows in traditional reds, whites and silvers so that my color scheme looks pretty and cohesive.


I hope you've found these wrapping tips helpful and I hope you enjoy wrapping presents this year! Thanks for stopping by!

Merry Christmas! 
Jesse 

Friday, December 13, 2013

On the 8th day of Christmas...

..my true love gave to me, a feature of my friend Hannah's house!! 

If you've read my blog with any consistency, you've probably heard me mention my friend Hannah before. I co-hosted her vintage bridal shower. Because she was one of my bridesmaids, you can also spot her in some of these pictures. Hannah also helped me with this Christmas DIY project

Because Hannah pops up on my blog from time to time, and because she has an adorable apartment, I decided to showcase her holiday home for day 8 of my "12 Days of Christmas" series. Plus, I think it is a nice change of pace to take a look at how other people have decorated their homes. I hope you enjoy!

The entry to Hannah's home is festive and welcoming.

Upon entering Hannah's apartment, you find yourself in her dining room. This space is home to a gorgeous gallery wall year round, but she has added a touch of Christmas in here as well! 
Side note: Hannah is excellent at getting the most bang for her buck. She found this 4 foot Christmas tree at a garage sale for just a couple bucks. To make the most of it, she placed it on a box and covered the box in burlap. It is now approximately 6.5 feet tall, and looks gorgeous in this space.

As you make your way through her home, you may also spot a little nook that is home to her stockings. Using a curtain rod is an excellent option for your stockings if you don't have a fireplace.

Go just around the corner, and you'll find yourself in the living room, which is the heart of this home. Pinecones, printables and wreaths dominate this space, making it both festive and welcoming.


In the living room, Hannah has another tree. This is her "main" tree and it is festooned in sparkly metallic colors.

Hannah also has an ornament that showcases the dried flowers from her wedding bouquet.

Thanks for taking a moment to peek into my friend's Christmas home. I hope you have enjoyed the tour. Stay tuned, the 9th day of Christmas will be coming soon!

Thanks,
Jesse

Wednesday, December 11, 2013

On the 7th Day of Christmas...

... my true love gave to me, a Christmas tree in the master bedroom! 

Remember back on the 2nd day of Christmas, I talked about my love for themed Christmas trees? Well this year we have one in our master bedroom! 

I realize I still haven't shared with you guys the full tour of our master bedroom, but I promise I will! The color scheme is similar to the rest of the house, with neutrals and light blues. Here's a pic I've shared before on Instagram (My username is @homeonhiddenoaks). 


I thought a themed tree would be a great addition to our bedroom for the holiday season, and I envisioned a "wintery" tree. I decided to stick with sparkly metallic colors like gold and silver, and of course, a wintery white. This is what I came up with: 


When I found this pre-lit 6.5 foot white tree at Walmart I knew I had to have it. (I'd been eying one at Hobby Lobby that was $70, and this one was $30 or $40, I can't remember exactly how much, but still a much better deal).

 I love the warm glow it creates in the evening. 


These sparkly ornaments can be found at Walmart. They have them in many colors, not just gold, silver and white. You certainly don't have to spend a ton of money to make your tree beautiful! 

 My never ending supply of left over burlap from Hannah's wedding shower was the perfect solution for a tree skirt. They are usually so expensive! I like the price tag of mine: $0

I hope you have enjoyed this peek into our master bedroom. Thanks for stopping by!

Happy Holidays!
Jesse