

I have been on the lookout for a french provincial dresser for the master bedroom for years.
But, of course, I didn't want to spend a lot of money. For several years, we used a dresser that Reid's dad built for him when he was a kid. I never loved the way it looked, but thought it was pretty cool that my father-in-law built it. (You can read about that, and get the full master bedroom tour here). Then finally after several years of searching, I stumbled across the perfect dresser on Craigslist.

I knew this was the one for several reasons.
1. It wasn't a real antique, which alleviated any guilt I would have otherwise had about painting it.
2. The size.
3. The price.
I have to be honest though. It's been a few months since I bought this, and I don't remember exactly how much it cost. I think it was $180.
Since I'd never tried chalk paint (I know, how can I be a blogger without having ever used chalk paint?), I decided to give it a whirl. Here are the supplies I used:


I'd done a lot of researching and read that you don't have to sand or prime when using chalk paint. After taking the drawers out and removing the hardware, I decided to give my dresser a light sanding anyway because the existing finish was very shiny and smooth, almost like a lacquer. I just did it by hand, and only spent about 10 minutes on it.


After one coat of paint, here is what it looked like. If you look closely you'll see that the floral pattern on the drawers was showing through the paint.

After the second coat, however, the paint had covered the dresser completely. I had enough paint left over in that tiny little container to do some touch ups, and that was all I needed. After I finished painting, the next step was to apply the wax using the no-shed cloths. Here is where I made my first mistake. Miraculously, that mistake turned out to be a good thing. I waited overnight to apply the wax and left the furniture in the garage where it gets warm. I knew that chalk paint tends to dry out quicker than regular paint, but I didn't know that one night in the heat without wax would cause it to crackle. The crackling effect is very mild and only on the drawer fronts, but I actually think it looks really pretty. It was difficult to get a photo of it, but here is my best attempt:

So the next day I brought my dresser back inside and applied the wax, using a circular motion. Then I allowed to wax to dry fully for about 72 hours before putting anything on or in the dresser. Then, because I am a winner, I waited for more than 5 weeks before I finally spray painted the hardware using an oil rubbed bronze color, and was actually able to use the dresser!
So, what's the verdict? I'm really happy with the chalk paint. The finish is very smooth and professional looking, and it is so nice not to have to deal with sanding or priming. It was very easy to work with, easy to clean up, and the smell was not strong at all. The only down side is having to wax because you are supposed to reapply the wax every six months or so. It only took me about 20 minutes to apply the wax, so it shouldn't be too much of a hassle to reapply. I can see how it would be overwhelming to do if all your furniture was painted with chalk paint though. I will definitely use chalk paint again, and think it is excellent for furniture remodels!
So, now onto the eye candy...


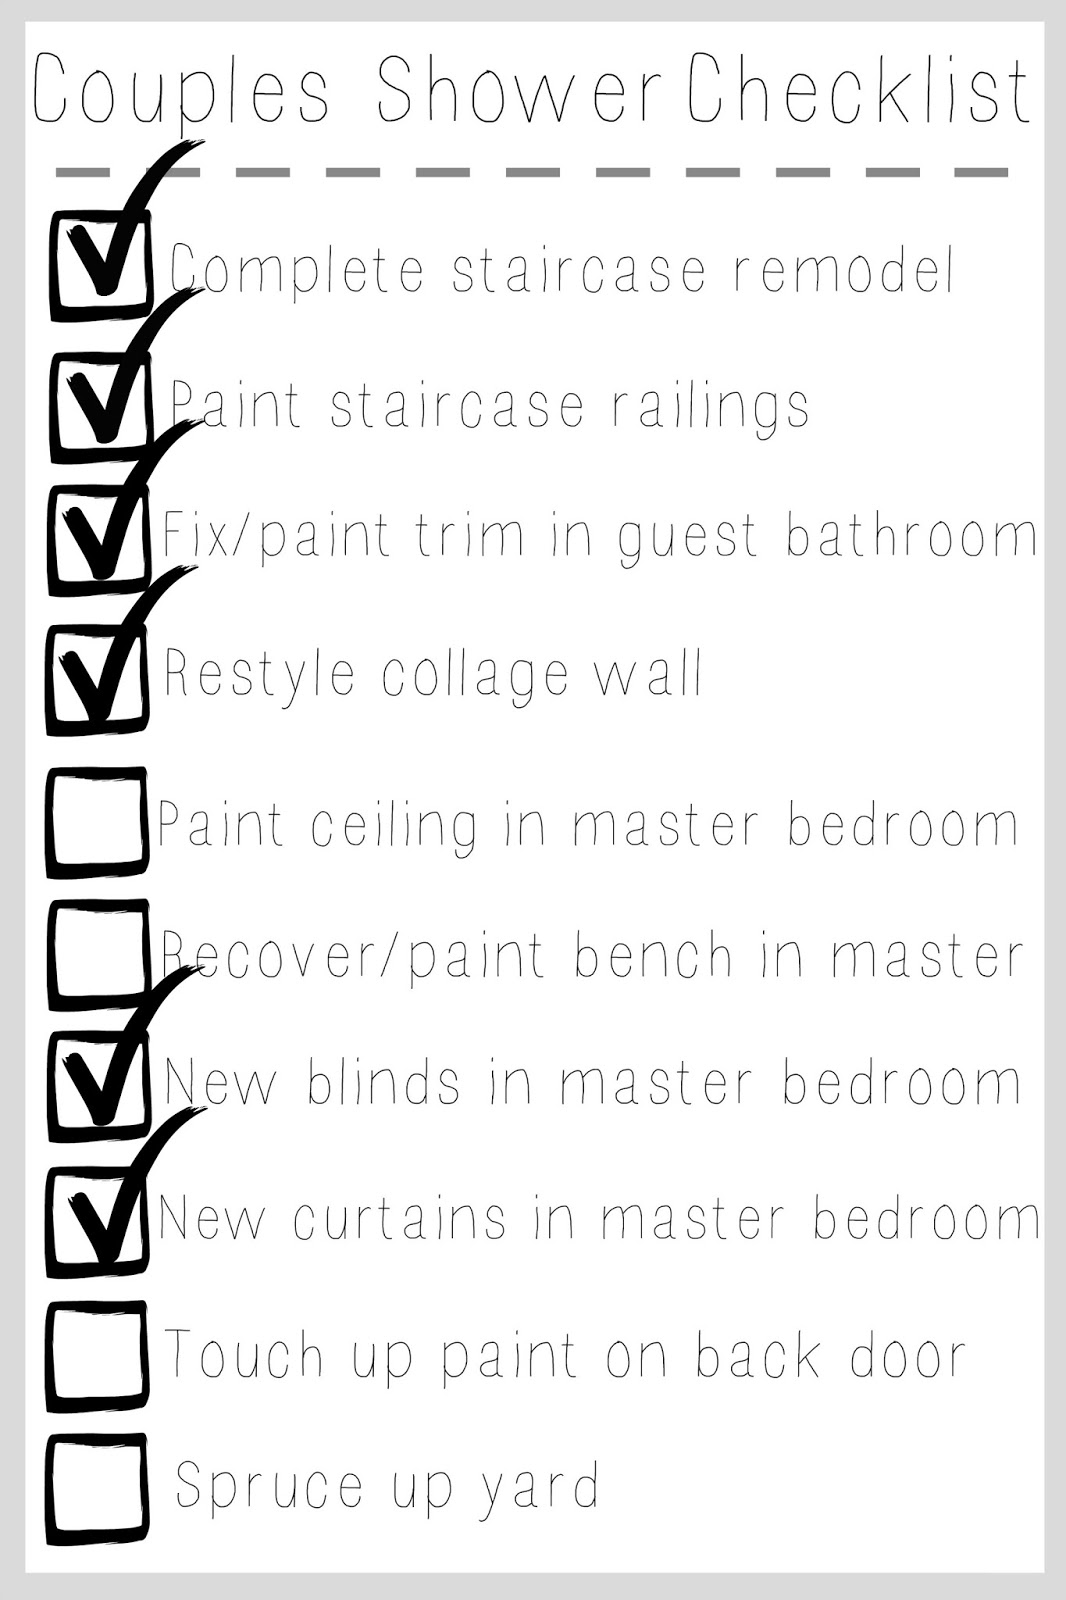
There you have it. My long overdue post on my new dresser is finally finished. Oh, by the way, while this project wasn't on my list of things to do before the couple's shower I'm hosting in July, I'm still making progress on that list as well! I finally fixed the trim that our dog damaged in the upstairs bathroom over the weekend. I've got about 3 weeks left to get the rest of these things done, so wish me luck!

Thanks for stopping by!

After the second coat, however, the paint had covered the dresser completely. I had enough paint left over in that tiny little container to do some touch ups, and that was all I needed. After I finished painting, the next step was to apply the wax using the no-shed cloths. Here is where I made my first mistake. Miraculously, that mistake turned out to be a good thing. I waited overnight to apply the wax and left the furniture in the garage where it gets warm. I knew that chalk paint tends to dry out quicker than regular paint, but I didn't know that one night in the heat without wax would cause it to crackle. The crackling effect is very mild and only on the drawer fronts, but I actually think it looks really pretty. It was difficult to get a photo of it, but here is my best attempt:

So the next day I brought my dresser back inside and applied the wax, using a circular motion. Then I allowed to wax to dry fully for about 72 hours before putting anything on or in the dresser. Then, because I am a winner, I waited for more than 5 weeks before I finally spray painted the hardware using an oil rubbed bronze color, and was actually able to use the dresser!
So, what's the verdict? I'm really happy with the chalk paint. The finish is very smooth and professional looking, and it is so nice not to have to deal with sanding or priming. It was very easy to work with, easy to clean up, and the smell was not strong at all. The only down side is having to wax because you are supposed to reapply the wax every six months or so. It only took me about 20 minutes to apply the wax, so it shouldn't be too much of a hassle to reapply. I can see how it would be overwhelming to do if all your furniture was painted with chalk paint though. I will definitely use chalk paint again, and think it is excellent for furniture remodels!
So, now onto the eye candy...


There you have it. My long overdue post on my new dresser is finally finished. Oh, by the way, while this project wasn't on my list of things to do before the couple's shower I'm hosting in July, I'm still making progress on that list as well! I finally fixed the trim that our dog damaged in the upstairs bathroom over the weekend. I've got about 3 weeks left to get the rest of these things done, so wish me luck!
Thanks for stopping by!

No comments:
Post a Comment
I'd love to hear from you!